From the Freezer Stuffed Bell Peppers

Freezer meals are fantastic for quick and easy eating, but the harsh environment of the freezer can have a real impact on taste. This recipe avoids the freezer burn and is packed with great flavor! And what’s even better~ It makes 12 servings, so you do the work once and it will feed you several times over.

Green bell peppers are the norm for stuffed bell pepper recipes, but in this one you’ll ditch the unripened pepper’s harsher taste for ripe peppers’ sweeter taste and great color. The filling flavors have to be able to withstand the freezer’s harsh conditions and still be great tasting once’s they’ve been cooked. Ground meat combined with Italian sausage and fresh herbs does the trick and can withstand the freezer and still have bold delicious flavor.
You may have noticed that these peppers are sliced a bit differently than most recipes~ They are sliced pole to pole. There’s a good reason for this~ they stay put. There’s more flat surface area to keep them from rolling around when they are laying face down, especially on a broiler pan, which is the preferred way to cook them.
 |
| Strait from the freezer, still wrapped. |
Stuffed bell peppers can often be soggy, and this is remedied by cooking them pepper-side up. The filling is held in place by a layer of tin foil poked with a few holes to allow steam to escape out. This way the peppers can roast properly and their flavors can really shine along with the rest of the ingredients.
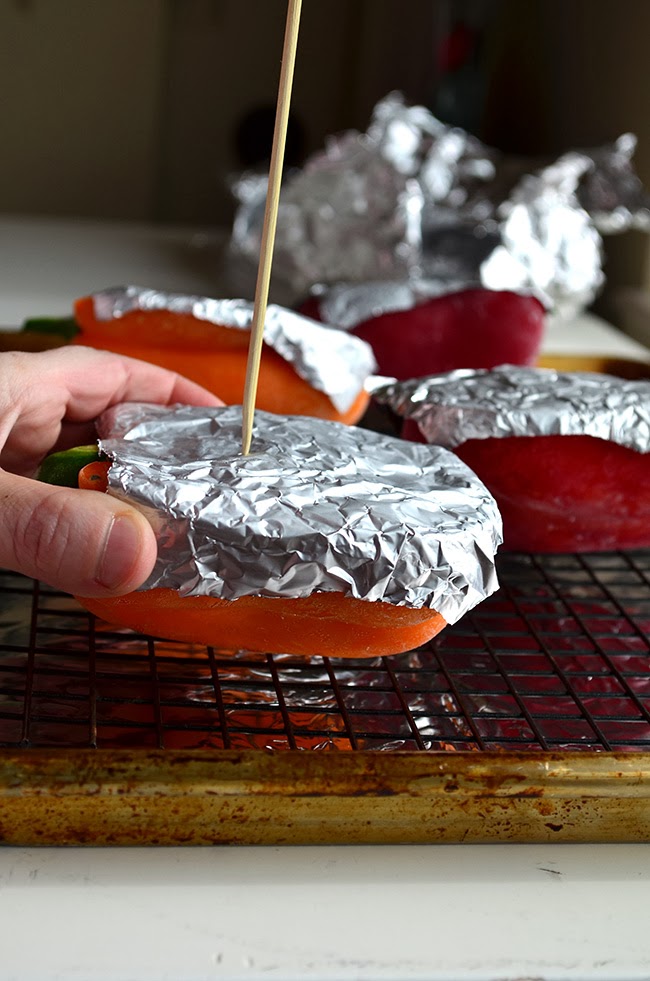 |
| Once unwrapped, a smaller piece of foil sprayed with cooking spray is placed over the filling. It’s then poked with a skewer a few times to vent. |
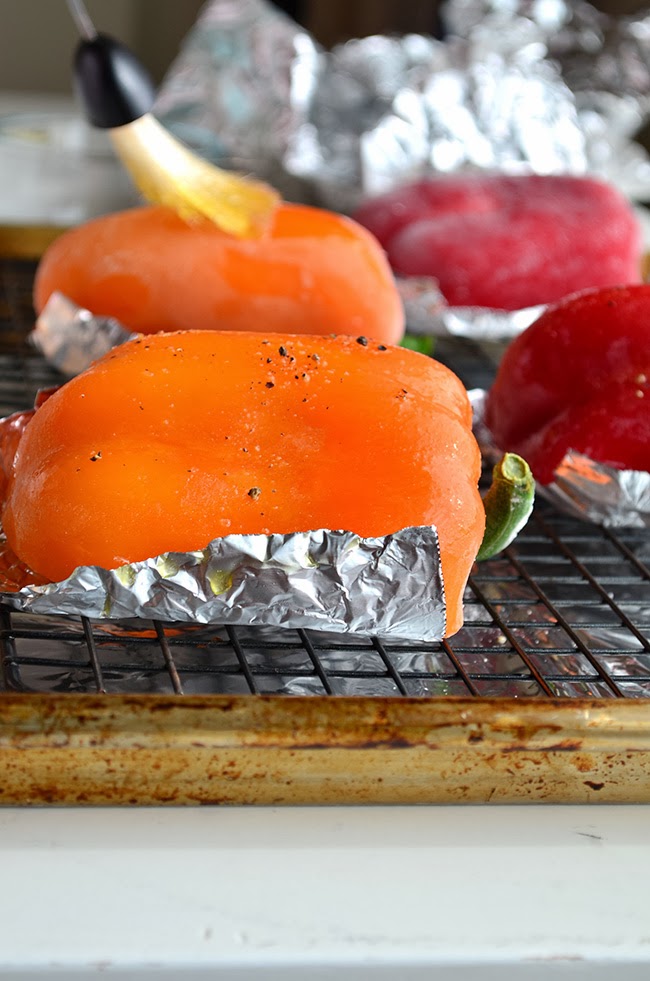 |
| Peppers are then placed filling side down, and brushed with olive oil. A couple generous pinches of salt and pepper are sprinkled on the bell peppers. |
 |
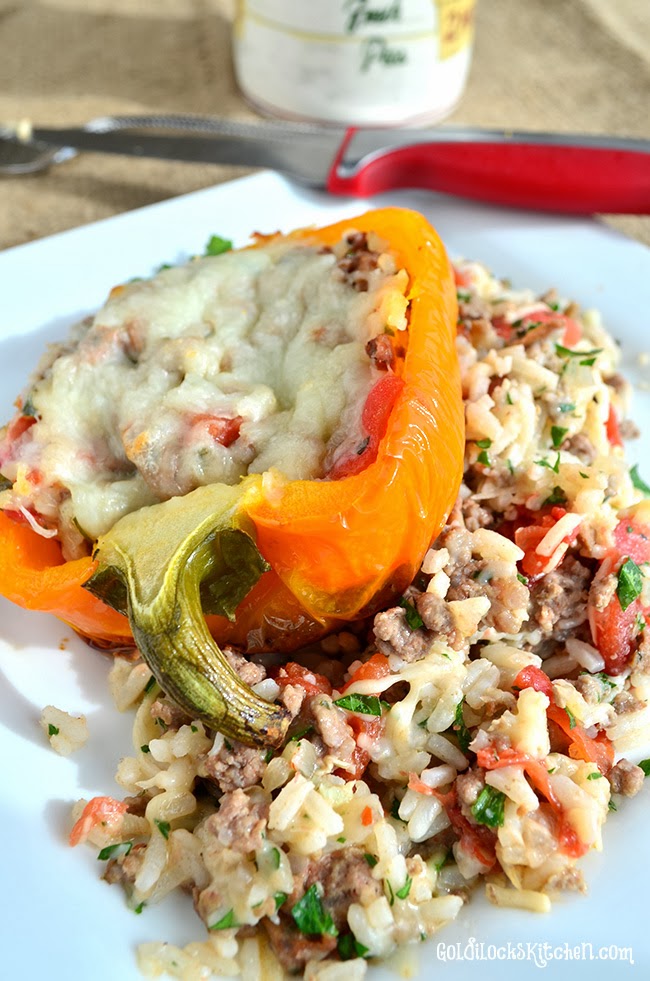
| When the peppers are done baking, they are turned over and the foil removed. Heap lots of Mozzarella cheese on top and pop them back in the oven to melt it. They are done! |
I hope you enjoy them! Please let me know about your experience, I’m relatively new to recipe blogging and I’d love the feedback :0)
Recipe adapted from one found on Cooks Country.
From the Freezer Stuffed Bell Peppers
- Total Time: 1 hour 15 minutes
- Yield: 12 1x
Description
A delicious Italian sausage and rice filling stuffed into colorful bell peppers brushed with olive oil. Make ahead food at it’s finest.
Ingredients
Peppers and Stuffing
- 1 tablespoon olive oil
- 1 medium onion, chopped fine
- 8 ounces ground beef
- 4 ounces Italian sausage, hot or mild
- 2 tablespoons Salt and Pepper each
- 4 garlic cloves, minced or pressed
- 2 cups cooked Jasmine rice
- 1 (14.5 oz) can diced tomatoes, drained
- 1 cup shredded mozzarella cheese
- 1/2 cup grated Parmesan cheese
- 3 tablespoons fresh minced parsley leaves
- 6 orange, red, or yellow bell peppers
For Serving
- 2 tablespoons olive oil
- Salt and Pepper
- 1 and 1/4 cups shredded mozzarella cheese
Instructions
- Heat oil in large skillet over medium high heat until shimmering. Cook onion until soft and lightly browned. Add beef and sausage and season the meet with a pinch of salt and pepper. Cook, breaking meat into small pieces with a wooden spoon, until the meat is browned. Mix in the garlic and cook just for 30 seconds. Remove from heat and drain mixture in a colander for at least 1 minute.
- Transfer the meat to a large mixing bowl and mix in the rice, both cheeses, tomatoes, parsley and 1/2 teaspoon salt and 1/4 teaspoon pepper. Place in the fridge and chill for at least 20 minutes. (If you are cooking the peppers right away, skip the fridge and wrapping the peppers in step 3.)
- Spoon filling into each half pepper. Wrap each pepper in two layers of plastic wrap and one final layer of tin foil. Place in the freezer until firm. The peppers can then be placed in large zip lock bags and stored for up to three months.
- When ready to serve, adjust oven rack to middle position and heat oven to 450 degrees. Unwrap the bell peppers and save a couple pieces of foil. Cover filling sides with cut or torn pieces of foil that are sprayed with cooking spray (so the cheese in the stuffing won’t stick). Using skewer or fork, pierce the foil with a few holes to vent. Place them foil side down over the vents of a broiler pan-top or, if you don’t have a broiler pan handy, on a wire rack set inside a baking sheet. Brush the peppers with olive oil and season generously with salt and pepper.
- Bake until the peppers are spotty brown, about 25 to 35 minutes. Flip them over with tongs and remove the foil. Cover the filling with shredded mozzarella and return to the oven for about 5 minutes, or until the cheese is melted and bubbly. Let rest 5 minutes before serving.
- Prep Time: 40 minutes
- Cook Time: 35 minutes
- Category: Entree
- Cuisine: American

You should cite your source for this recipe, since you did not create it but copied it nearly verbatim from Cook’s Country (America’s Test Kitchen).
Thanks Liz for pointing that out! I have changed the post and cited Cooks Country for the recipe. It was one of my older posts back when I was a newbie blogger who didn’t know about internet etiquette :0)
Oh! it’s great for me. I could not handle greed to apply your ideas. thanks for the nice sharing.
This is one of my families favorite meals. I like it too because it’s easy to make. Great flavors and a happy family. What more can you ask for?
Thank you so much Mathew!
Yummy thank you for sharing the delicious recipe. I will definitely try it very soon
Thank you Tania! I appreciate the feedback. Let me know how it goes :0)