Make Ahead Flakey Crescent Rolls

Who of you out there loves crescent rolls? (Who doesn’t?!) Ever bought the crescent rolls in a can and tried to eat them after they’ve cooled? They’re not bad if eaten immediately, but if left to cool…. stale and icky. Just in time for the holiday weekend, here is a lovely recipe for real Make Ahead Flaky Crescent Rolls. These rolls you can make up to three days in advance, which is sooooooo much more convenient than having to get your counter (and yourself) covered in flour and dough while trying to cook up the rest of your dinner. Oh, and you should probably make a double batch, cuz they’re delicious and you’ll wish you had more. Really. Seriously.
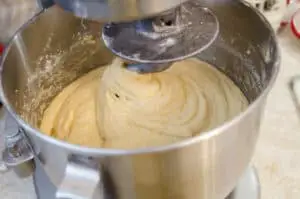
This dough is full of butter, a whole cup full (16 oz)! Mmmmmmm, butter…..This is so much butter that the dough doesn’t even come together in a nice ball around your dough hook. But don’t worry this is normal, as shown above. These pics show a double batch, so you won’t have this much dough if you follow the recipe as is, just FYI :0)
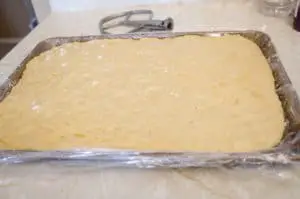
Transfer the dough to a large bowl sprayed with cooking spray and let it rise for about 3 hours in a warm place. You’ll turn the prepared dough out onto a rimmed baking sheet that is lined with plastic wrap, and cover the top as well. Then pop it in the fridge overnight. Don’t rush it! The secret to these rolls being so good is the long refrigeration. It’s a chemistry thing with proteins and butter and blah blah blah. It’s important, okay, trust me…
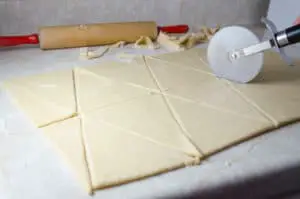
The next day, you ‘ll roll the dough and shape the rolls. So I know most peeps roll out their dough for crescents into a big pizza circle (that’s how I remember my mom always doing it) but I am kinda limited on counter space. So I shaped the dough into a rectangle as I rolled it out and cut in like manner above. Feel free to make the pizza if you have the room :0)
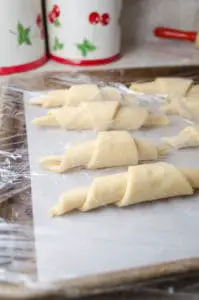
Then you’ll roll them up, wide end towards the taper and place back on your rimmed baking sheet that you have lined with parchment paper. You can fold the ends to look like croissants, but my family has always just rolled them and baked them like the above photo. Now cover rolls with plastic wrap and let them sit in the fridge for at least two hours or up to three days. Yay! Rolls out of the way and you can move on to creating other culinary masterpieces with no stress. (Well, with less stress anyway :0) About an hour before you want to serve them, take them out and let them sit at room temp for about 40 mins to warm up. This is a great time to warm your oven and brush them with melted butter before popping them into the oven. Then slip them in, and out comes…voila!

Flaky, buttery, real, delicious crescent rolls! Ready with the rest of your food :0) Enjoy! I hope you love this recipe, I have adapted it from a recipe found in Baking Illustrated. You’re welcome to let me know how it goes :0)
Print
Make Ahead Flaky Crescent Rolls
Ingredients
- 1/3 cup skim milk
- 16 tablespoons of butter, sliced into 16 pieces, plus 2 more tablespoons for glazing
- 1/4 cup sugar
- 3 large eggs, lightly beaten
- 4 cups all-purpose flour plus more for dusting work surface
- 1 teaspoon rapid-rise yeast
- 1 1/2 teaspoons salt
Instructions
- Whisk together the milk, butter, sugar and eggs in a microwave safe bowl. Place in the microwave and cook for 1 minute. Whisk and cook 30 seconds. Repeat until the mixture reaches about 110 to 115 degrees.
- Whisk together the flour and yeast in the bowl of a stand mixer. With the dough hook attached and running at low speed, slowly pour the liquids into the flour mixture. A runny, shiny dough will form. Mix on low for about 1 minute, and then turn the speed up to medium and mix for another 3 minutes or so, and slowly add the salt while it’s running. This dough will remain ‘loose’ and not form a ball around the dough hook. (See photos.)
- Transfer dough to a large bowl sprayed with cooking spray and cover tightly with plastic wrap. Let rise in a warm area for about 3 hours, or until doubled in size.
- Line a rimmed baking sheet with plastic wrap and sprinkle the top of the dough with a little bit of flour. press down the flour and dump it onto the plastic wrap in the baking sheet. Cover the top with plastic wrap and refrigerate overnight.
- The next day, take the dough out and let it warm on the counter for about 10 minutes. Dump it out on a lightly floured surface and roll out to about 1/8 to 1/16 inch thin. (Some like to make a large circle, I form a rectangle to save space.) Line the rimmed baking sheet with parchment paper. With a pizza cutter, slice the dough into triangles and roll the large end to the small. Place on the baking sheet. Cover with plastic wrap and refrigerate for 2 hours to three days.
- Remove the rolls from the fridge and remove the plastic wrap. Cover with another rimmed baking sheet (or stick in a large plastic bag if you don’t have another rimmed baking sheet). Let them sit on the counter for 45 to 60 minutes. Preheat your oven to 425 degrees and move a rack to center position, and another rack just below it. Place a brownie pan or other oven pan on the lower rack and allow it to heat with the oven.
- Melt the remaining two tablespoons of butter in the microwave and with a pastry brush, gently glaze the tops of the doughy rolls. Place the rolls in the oven on the center rack. Quickly pour a cup or two of hot tap water into the pan below it. It will hiss and steam, this is ok, just be careful. Set the timer to 10 minutes. After the rolls have cooked for 10 minutes, lower the oven temp to 325 and bake for another 14-16 minutes, or when the rolls are light golden brown. Remove from the oven and cool on a wire rack for about 5 minutes and serve warm with butter.
- Category: Bread
- Cuisine: American