Marshmallow High-Hat Cupcakes
Marshmallow High-Hat Cupcakes. Oh. My. Gosh. Cute! As a nation, we Americans are completely in love with cupcakes. I am 100% included. I have seen a lot of incredible, amazing cupcakes on TV shows, in magazines, and on Pinterest. But I had never before seen a recipe for High Hat cupcakes until just recently on Martha Stewart’s website. And besides being super cute, they’re actually easy to make!
Marshmallow High Hat Cupcakes
I am completely in love with the taste of chocolate covered marshmallow and marshmallow cream. Every Easter or Christmas, when Russell Stover’s boxes of marshmallow covered figures fill the isles at the store, I have to stop myself from loading up my cart with boxes of fluffy chocolate heaven. Seriously soooo tempting :0)
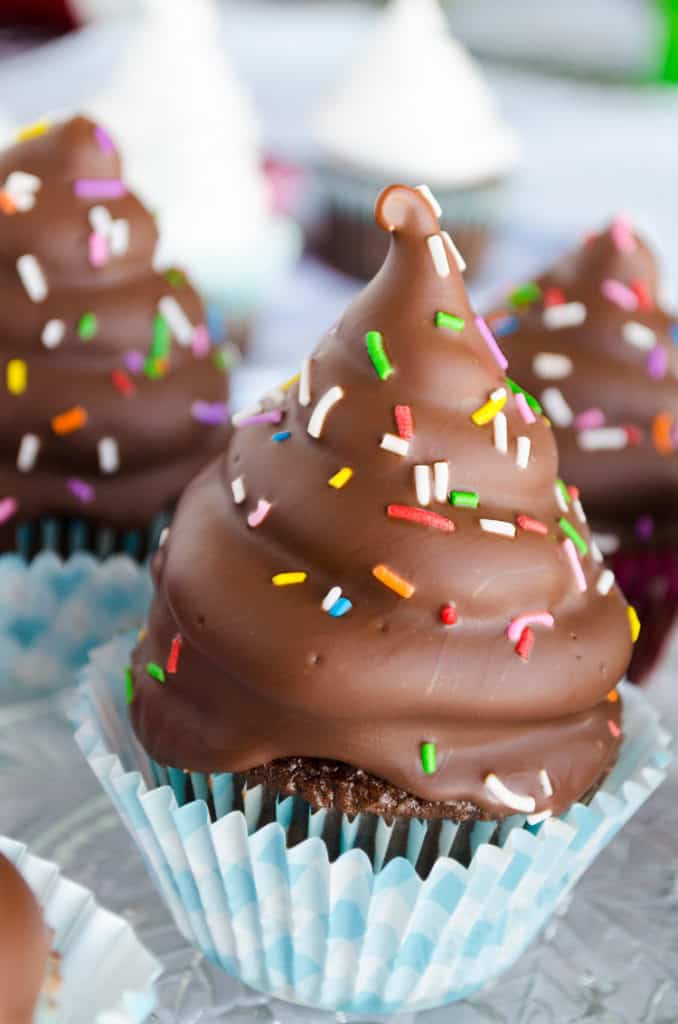
So when I saw this recipe I knew I had to make it my own and use a marshmallow cream ‘frosting’ instead of traditional frosting. I imagine any frosting would be good with this recipe, so long as it’s a stiff frosting that will hold it’s shape well. Hence my creation of Marshmallow High-Hat Cupcakes! (And they are just so stinkin’ cute with the sprinkles…)
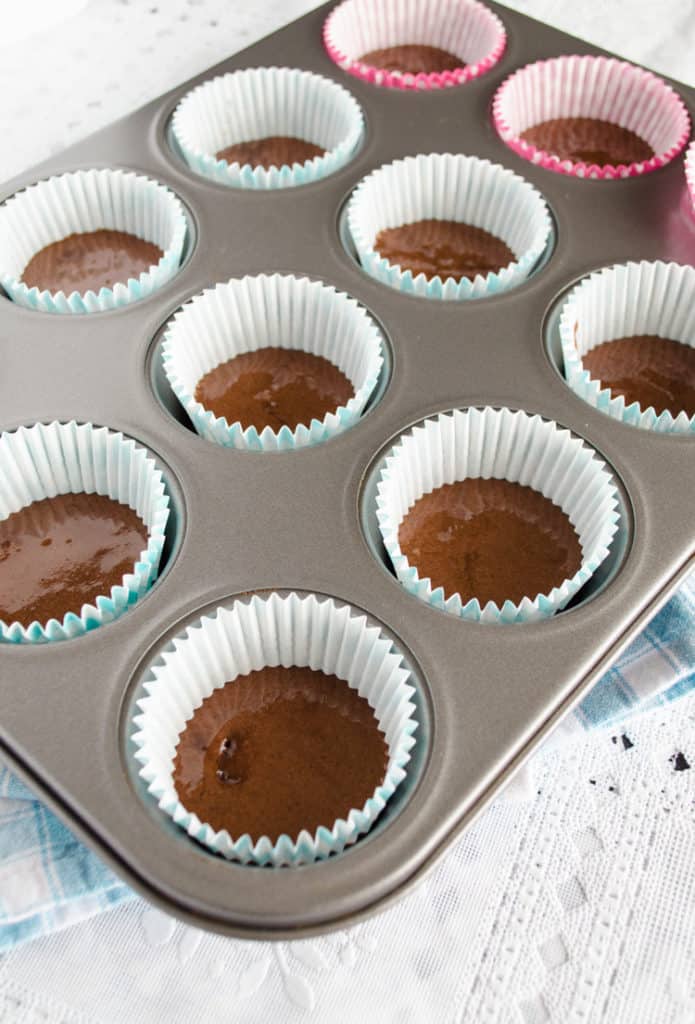
When baking these cupcakes, I make it simple and use a store bought mix for Devil’s Food Chocolate cake. It’s a rich dark chocolate cake that uses dutch processed cocoa, the yummiest kind of cocoa ;0) Each brand has it’s own amounts of eggs and oil to add, so just prepare the batter according to the box directions. These cupcakes need to bake up relatively flat, so you’ll have a good surface to pile on the frosting and hold it there. Baked cupcakes risen just barely above the top of the liner is ideal. So fill your cupcake liners sparingly. About 1/3 of the way up the sides of the liner is good. And if they end up too tall, or not tall enough it’s not the end of the world either. Just have fun, you’re baking cupcakes remember?!
While the cupcakes are cooling, you can move on to whipping up your very own homemade marshmallow cream. A stand mixer is super handy for this recipe, but definitely not necessary. Just make sure you have some kind of metal mixing bowl to use. You’ll begin by adding all the ingredients into it and setting it over a pot of simmering water. I would hate for you to melt a hole in your nice plastic mixing bowl. After a quick run on the stove, the mixture needs to be whipped to stiff peaks. A hand held mixer will do, but I stand mixer would make life easier. I love my KitchenAid stand mixer!

FYI: This frosting will set up over time, so don’t worry if seems to creamy at first. Just make sure you whip to stiff peaks before applying it to your cupcakes. You don’t want to make this frosting and save it for later. It needs to be piped on right away. If you want your cupcakes to look like a chocolate dipped soft serve ice cream cone, you’ll need to pipe the frosting on with a large diameter piping tip. I got mine at my local craft store. I used a 1/4 inch round tip. Try to leave 1/8 inch space of bare cake around the outside too. It will help to ‘seal’ the frosting in when completely covered in chocolate. It may take a bit of practice to get a pretty swirl of frosting on there, but you’ll get it! And if you don’t that’s ok because you need to taste test some, right? Once you’ve covered all the cupcakes, pop them in the fridge for at least 20 minutes to help set up the marshmallow cream.
A Cupcake Dipped in rich homemade magic shell.
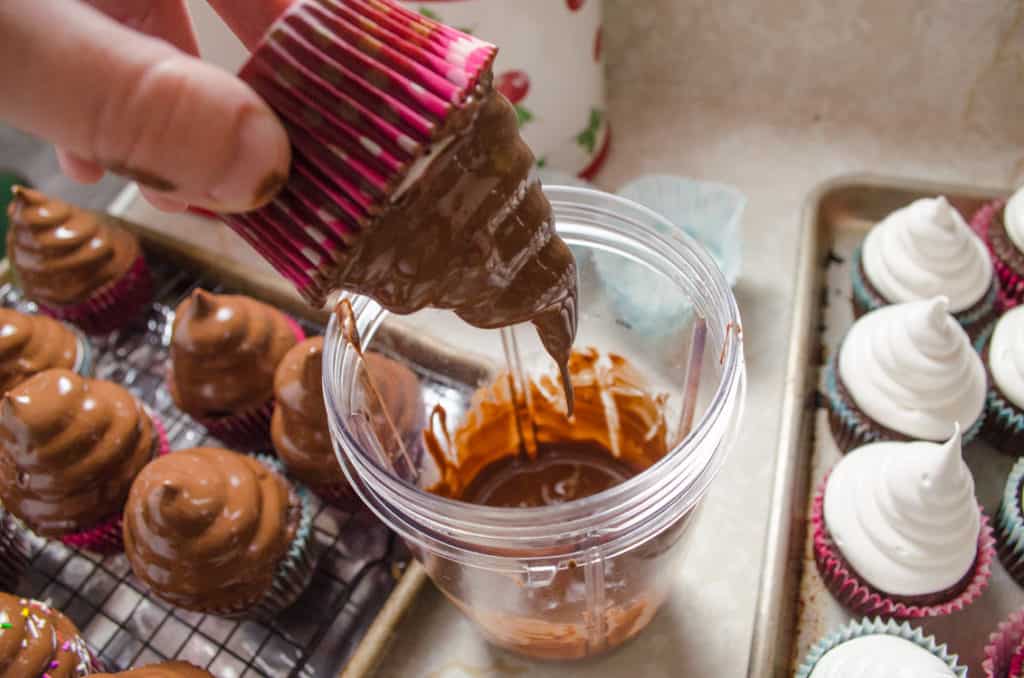
The recipe for homemade magic shell couldn’t be easier~ Just melt chocolate with any hi-heat oil (heats well to high temps) like coconut oil, safflower oil or even vegetable oil. I like to use coconut oil because of the added flavor it gives to the chocolate. Just melt the oil and chocolate carefully in the microwave, stirring every 30 seconds and cooking at half power, so you don’t overcook it and end up with crunchy scorched chocolate. Stir until smooooooth. And then lick the spoon while no one is looking. Ok forget I said that…
Once your cupcakes have chilled for 20 – 30 minutes they’re ready to be dipped! Place the chocolate in a container that is both deep enough and wide enough to completely cover the frosting. You’ll want to try to get all the cupcakes done within 10 minutes. If they get to warm, you’ll have your high-hats falling off into your chocolate container. Now is the time to add sprinkles to your freshly dipped cupcakes. Stand back and admire the absolute adorableness that you just created! Then put them all back in the fridge for at least 30 minutes. They will keep well in the fridge for about 3 days.
These Marshmallow High-Hat cupcakes are both yummy and adorable. I hope you have tons of fun making them. And that you make a mess eating them hahaha ;0) And if you’re curious, you can click here to see Martha’s version and watch her make them!
Print
Marshmallow High Hat Cupcakes
- Total Time: 1 hour 50 minutes
- Yield: 34 1x
Description
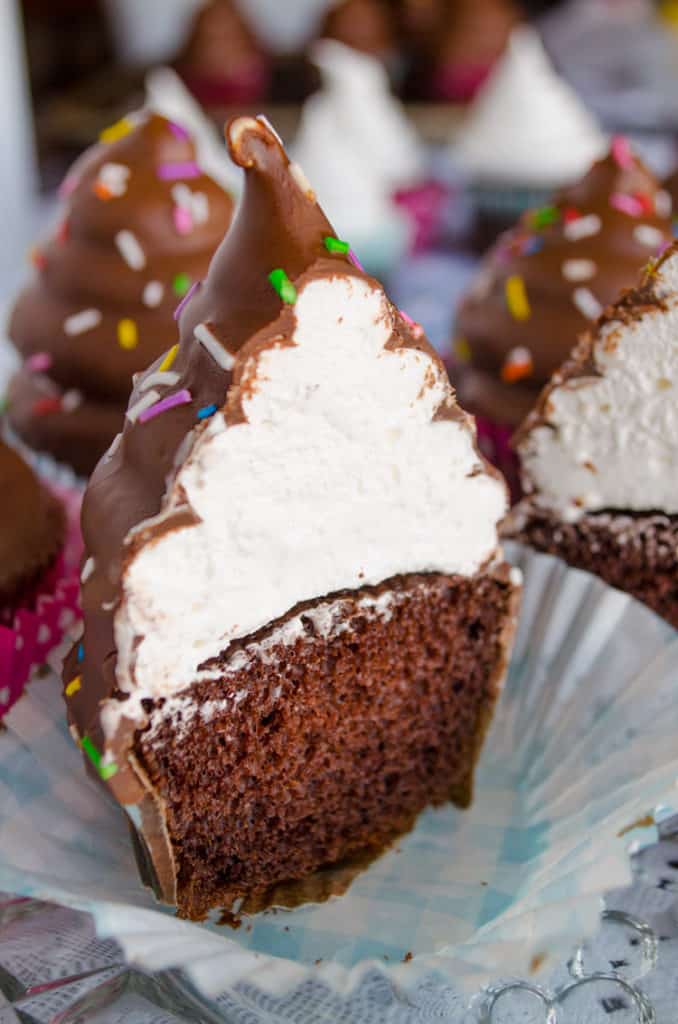
Mounds of fluffy whipped marshmallow top a rich chocolate cupcake. Then it’s all smothered in rich chocolate magic shell.
Ingredients
- 1 Box of Devil’s Food chocolate cake mix
- whole eggs
- vegetable oil
- 8 egg whites
- 2 cups granulated sugar
- 1/2 teaspoon cream of tartar
- 2 teaspoons vanilla extract
- 3 cups semi-sweet chocolate chips
- 3 Tablespoons of coconut oil
- 34 cupcake liners
Instructions
- Set the oven to heat to 350 degrees. Following the directions on your box of cake mix, prepare the cake batter using the suggested amount of eggs and oil on the box. This will vary depending on the brand of cake mix you buy.
- Line a cupcake tin with cupcake liners. Fill the liners sparingly with batter, no more than 1/3 full. Bake for about 18 to 20 minutes or until the tops are firm and a toothpick inserted in the center comes out clean. Remove the cupcakes from the tin and cool on a wire rack. Repeat baking until you have used up all the batter.
- In a heatproof bowl, add the egg whites, sugar and cream of tartar. (If you have a stand mixer, use it’s bowl.) Set over a pot of simmering water and whisk by hand for about 5 minutes, until the sugar is dissolved and mixture is warm. Remove the bowl and add the vanilla. Whip the egg white mixture to stiff peaks with a hand held mixer or with a stand mixer with the whip attachment.
- Fill a large pastry bag fitted with a round tip (1/4 inch to 1/2 inch in diameter is best) with the marshmallow cream. Pipe the cream onto each cupcake, starting in the center and swirling around the edge and then up and towards the center again (like a soft serve ice cream cone). Place the frosted cupcakes in the fridge for at least 20 minutes.
- Place the chocolate chips and coconut oil in a microwave safe container. Cook on half power for about a minute. Stir the melted chips and oil together until smooth. (Can be cooked a little longer in the microwave if needed, on half power, to fully melt. Be careful not to scorch the chocolate.)
- Place the melted chocolate into a tall cup wide enough to dip the cupcakes. Remove from the fridge and dunk the frosted portion into the chocolate. Try to cover the entire top, so no white is peaking out. If some spots are missed, just drizzle a little chocolate over the spot to cover. If desired, sprinkles can be added at this time. Place the finished cupcakes back in the fridge to set, at least 30 minutes. Serve and smile.
- Prep Time: 1 hour 30 minutes
- Cook Time: 20 minutes
- Category: Dessert
- Cuisine: American

Have you made this a day ahead? How does it hold up?
Hi Rebecca! They should hold up great overnight as long as they’re stored in the fridge or a cool place. Hope that helps 🙂
The color turned out beautiful! I can’t wait to try them today. I hope it would be an amazing experience for me. My kid, Sara loves cupcakes. Thanks for the list of instructions. Carry on, please.